Handy 3D printing tips by CREAT3D: Rafts, supports & brims26 February 2014 | Sabina Gonzalez-George  Raft, support and brims are all things that can be enabled in your 3D printer software to help you create your print. In most cases, the 3D printer software will analyse your models and will add these components automatically in the places they are needed.
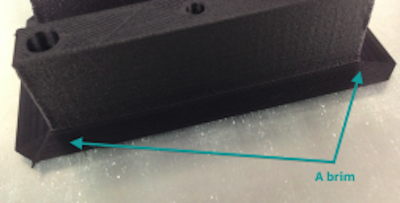
A brim A brim is basically like a skirt for your object. It is a layer of plastic that is laid down around the base of your object to increase its surface area. A brim, however, does not extend underneath your object, which is the difference between a brim and a raft.
A raft A raft is also used to extend the surface area of your object, however a raft normally consists of multiple layers of plastic laid down onto your print bed on top of which your object is then printed. This can sometimes be hard to remove from the bottom of your object and normally will not leave a perfectly flat finish.
Both the brim and the raft are useful to try to reduce warping. For more information on warping, see our previous article.
Support material Support material is slightly different to a brim and a raft, in that support material may be built directly onto your print bed but also may be built into your object. With 3D printing, any overhangs or structure with too sharp an angle will need support material to enable it to be printed. For example Cubify recommend using support structures for angles over 50°.
The simplest way to create support materials for your prints is to use the 3D printer software, which works out where support material is needed and add it for you, ready for printing. However, this isn’t always the most efficient way of placing support material and it may be that designing your own support material into your object at the design phase gives a better final result.
The thing to remember about support material, is that it is not a flat, solid surface, so any object printed onto support material will not have as smooth a surface finish, as compared to printing flat onto the print pad. It is always worth keeping in mind the final use of your object, as it may be that you choose to orientate your print in a way that is not optimum in terms of print speed, but it allows you to print an important surface onto the print bed, whereas a hidden surface could then be printed onto support material.
Removing support material In most cases support material can be removed with your fingers or needle nose pliers. In some instances, to get a flatter finish, you could try sanding your object, particularly when removing a raft. We would suggest starting with coarse sandpaper, followed by a fine wet & dry sandpaper to further smooth. You can also use small differently shaped files to reach into corners and smaller spaces.
Other options Other options include printing with a support material such as PVA which can be dissolved in hot water. We will also be stocking a range of other desktop 3D printers that offer this option, more details coming soon!
| |
