Expanding Material Horizons: Validating New Resins on the Form 4L
How to Unlock New Material Capabilities
Monday 28th July 2025
The effectiveness of Additive Manufacturing is impacted by a critical factor: the materials you can print with - their quality, mechanical properties, and performance. CREAT3D partners with AM manufacturers who have meticulously developed and tested their materials to work seamlessly with their precision hardware, ensuring consistently high-quality results. This commitment to validation and reliability is why their printers are so widely trusted and used across industry.
However, sometimes further functionality is required by a customer, for example using a specific industrial resin, matching formulations for unique applications, or developing niche materials for R&D and product development. For these advanced applications, Formlabs has released Open Material Mode, which offers a valuable opportunity to extend the capabilities of SLA and SLS printers while retaining the speed and precision of the platform.
The opportunity to use third-party or custom-formulated resins gives manufacturers and product designers greater control and flexibility, but opening up material compatibility is only part of the journey. To get reliable, high-quality prints, each new material must be carefully validated to ensure it meets your application needs.
Our Engineering Director, Matthew MacDonald, has been leading the charge, methodically testing and dialling in new resins on the Formlabs Form 4L to expand what’s possible for our customers and in-house projects alike.
Read on to see how we dialled in Henkel Loctite IND475 flexible resin to the Form 4L, the depth of testing and sharing a few key tips. Spoiler alert! It involves time, patience, methodical testing and experience in both AM and Formlabs.
Open Mode, Open Options
Formlabs already offers an impressive breadth and depth of 45+ materials, rigorously validated to deliver consistent, reliable results on their SLA and SLS printers, across a wide range of applications, from durable engineering parts to flexible component and biocompatible medical devices.
Their teams of material scientists have invested years in developing, validating and releasing these materials. As such, for most users, this remains the best route to consistent, high-quality printing with minimal fuss, leveraging the ecosystem of materials and workflows Formlabs has developed to a high standard.
For those advanced users looking to achieve mechanical properties beyond those available with Formlabs extensive range of resins, Open Mode enables further options.
What is Formlabs Open Mode?
It's a one‑time, per‑printer software license that unlocks the freedom to print with any 405 nm photopolymer resin (SLA printers) or any 1064 nm powder (SLS Fuse 1 series) on supported Formlabs machines.
In this blog, we focus on using the Formlabs Open Material Mode on the Form 4L.
Why Take the Time to Validate a Material?
The properties and viscosity of a material affect how it prints. Therefore, validating a material is key to ensuring the 3D printed parts deliver the material performance required for that application, unlocking mechanical, thermal or aesthetic requirements, allied with consistent and repeatable printing performance.
Fine-tuning print settings for a specific resin helps maximise part quality, improve success rates and dimensional accuracy, ensuring your AM process will deliver exactly what you need, every time.
What Material are we Validating, and Why?
We needed to use a flexible, durable material to make custom constant velocity joint boots (CVJs). While the Formlabs material (Flexible 80A) is an excellent flexible option, we need increased mechanical qualities for elongation at break, and we needed the base material to be black.
We identified Henkel Loctite IND475 as the correct material for our application based on the Technical Data Sheet (TDS). The material offers excellent flexibility and can withstand repeated motion thanks to its high fatigue resistance and elongation at break, and it came in black, which was exactly what we needed.
How do we Validate and Dial-in the Resin?
To begin, you need to activate Open Material Mode on your 4L printer (once you have purchased the licence!)
Setting up Open Material Mode
- Activate Open Material mode: Ensure your printer is connected to the internet. On your printer, tap the gear icon, navigate to General > Advanced capabilities > Activate new capability, enter your activation code, and confirm. You can also verify activation via PreForm by selecting your printer and checking for a blue ribbon icon
- Create Custom Print settings: Open PreForm, go to Edit > Print Settings Editor, select a Formlabs material with similar properties to your resin, toggle Open Material to ON, and save your custom settings
Review the TDS
We reviewed the Technical Data Sheet (TDS) for this material and choose an appropriate Formlabs base print profile as a starting print. The selection for the print profile was based on material attributes such as colour, viscosity and additives.
Modify Print Profile Settings
Here comes the expertise…
A couple of modifications were made to the base print settings to align them closer to Henkel Loctite’s validation, combined with our own extensive experience of running Formlabs SLA printers, such as scaling factors, and peeling behaviour.
Fine Tuning Stage 1: Standardised Test Print
Here comes the patience and methodical testing…
We completed a first print using standardised open mode test print.
Then we repeated this with a number of subsequent prints, during which tuning of scaling factor, exposure settings and peel speeds were methodically recorded, and tweaked until constancy of outcome was achieved.
A cycle of trial and error, fine adjustments and re-printing.

Material validation test model in Preform (Formlabs printer software)
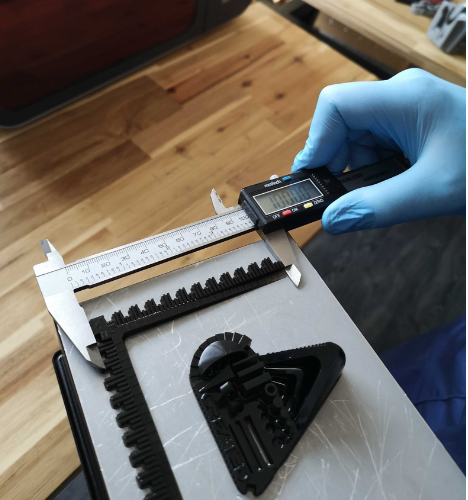
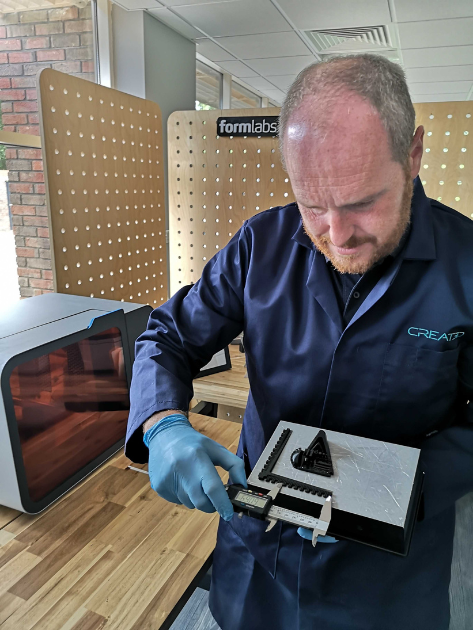
Measuring the validation test print for accuracy
Fine Tuning Stage 2: Dialling in the Final Print
Back to the expertise again…
Once we were happy with our validated profile on the standard print, we moved to printing the actual part needed.
At this stage, dimensional accuracy of the finished part is critical and there are additional factors to take into consideration. These will also need adjusting and fine-tuning during testing.
Take for example model orientation, printing at a 30-40 degree angle often yields the best dimensional accuracy, but you also need to consider the most important surfaces to preserve, where the supports adhere to and mitigating forces such as suction during the printing process. Tuning dimensional accuracy and scaling are further adjusted to compensate for horizontal expansion during printing.
And….right-first-time! Because we took the time to validate and dial-in the material during testing, the actual part printed successfully first time, and matched the design specification, ready to be deployed and used.
How Long does it Take to Validate a New Material?
As we have extensive knowledge and experience in validating other materials, the time it takes the CREAT3D Engineering Team to validate a new material is quicker than going it alone! As a guide, we typically take around 8-10 hours of testing. This is in addition to the original material selection, profile review and adjustments.
For this project we did 6 material test prints, including the final validation print.
Top 4 Considerations when Validating a Material
We get it, taking the time to validate and dial-in a material is lengthy and the process is time consuming (that’s also why we do it for our clients), but the results are worth it. It means access to different materials for advanced part performance.
To help, here’s our top tips:
Above all else, perseverance and a methodical approach are key!
- Standardisation: Use a standard .stl, sliced with PreForm for first stage testing. This allows for consistency in geometry across all experimentation prints
- Experimentation: Don't be afraid to try different orientations and settings. Each print provides valuable insights. Although try to limit the variables that you change between each print allowing you to identify what factors are having a positive or negative effect.
- Base Material: When selecting a base material, consider colour, viscosity and additives to choose a similar base profile. Match the data from the TDS from the manufacturer to the base profile.
- Maintenance: Keep your printer and resin tank clean to reduce print defects and skewing results during validation.
Unlock New Possibilities with Confidence
Tuning and validating an Open Mode material on the Form 4L requires perseverance and experimentation. Being methodical in what variables you change, and using a standardised methodology on this journey can lead to achieving high-quality prints and unlock new possibilities with resins using while still using Formlabs’ proven hardware.
Validating new materials for your 3D printer isn’t just an interesting side project; it’s a strategic move that can open up new applications, improve part performance, and drive cost efficiencies across your workflows. It unlocks new possibilities for advanced applications while ensuring your prints meet the highest standards.
Whether you’re looking to get the most out of your existing AM setup or exploring new materials for specific projects, taking the time to validate pays dividends in part quality and process reliability.
Use CREAT3D’s Expertise
If you want to benefit from expanded material capabilities without the hassle of dialling in yourself, get in touch. Our team has the expertise and equipment to help you print with confidence, using the right materials for your needs.