From Scan to Fit: Applying 3D Scanning with Additive Manufacturing for Complex Geometries
Monday 20th October 2025
In engineering, precision starts with reliable data, but that’s not always easy to obtain. When original design files aren’t available, or the part features complex curves and hard-to-reach areas, capturing accurate geometry becomes a challenge. Whether the goal is to modify or enhance a part, achieving a precise fit without extensive manual measurement can be a challenge.
That’s where the combination of 3D scanning and Additive Manufacturing comes in.
In this project, we applied both these digital technologies to a motorbike, a Honda CBR-650R. Full of compact, unique geometries and hard to access components, our team used the Peel 3D handheld scanner to access accurate base data from which we designed additional covers, mounts and accessories.
What Tools did we Use?
Capturing Complex Geometry with 3D Scanning
The first step was to capture accurate surface data from select areas of the bike, including mounting points, fairings, and housings, using a Peel 3 3D scanner.
Scanning records the exact physical geometry as a 3D mesh, ready for direct import into CAD software. This ensures that any subsequent part design, modification, or interface aligns precisely with the original surface data.
To achieve consistent scan quality, several best practices were followed:
- Surfaces were cleaned and free from grease or reflective coatings
- Target markers were applied in a random pattern for accurate alignment with the scanner
- Light-coloured surfaces were scanned in controlled lighting to improve contrast
- Scanning was performed in slow, smooth passes to ensure continuous data capture
The result: a high-resolution digital model of the target areas, the foundation for accurate design work.
Of course, these measurements could (theoretically) have been captured manually, but it would have required a mix of manual measurement and reverse impressions — a slow process with limited accuracy. By scanning, we estimate that several hours of manual work were saved, while achieving far greater precision. The curved, irregular geometry of the bike meant there were virtually no flat or square surfaces to reference. Capturing and aligning attachment points by hand would have been extremely difficult, leading to inconsistencies and unreliable data.
Designing for Precision and Performance
Using the scanned data, we designed and produced a series of custom components to fit directly onto the bike. Each part served a distinct function and was printed using the most appropriate material for its environment and loading conditions:
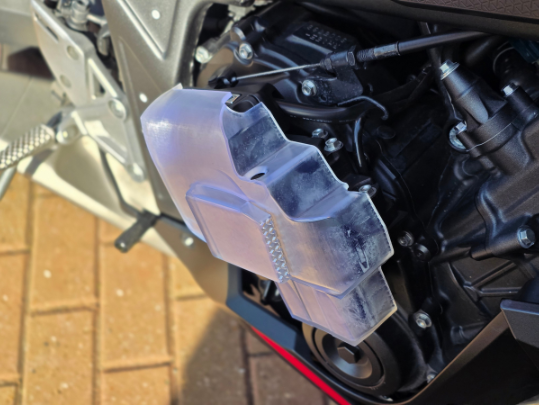
E Clutch Cover:
To provide channel for cooling and a protective cover around the e-clutch within the engine.
Material: High Temperature resin (heat resistant up to 238°C)
Print time: 3 hours 30 mins
Part cost: £39.27
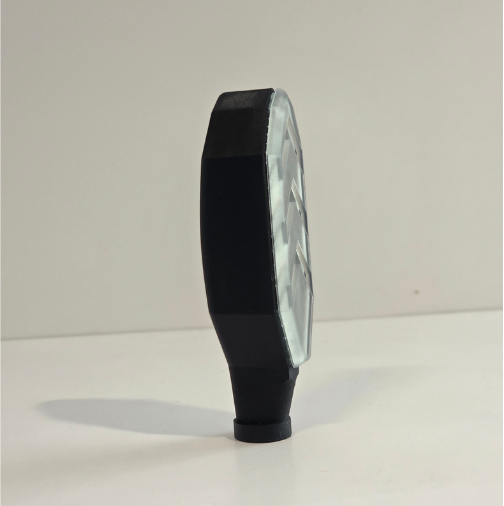
Indicator Housing:
Tailored for aftermarket LED lights. Clear housing allows for light transmission, ideal for the light diffuser portion of the indicator housing.
Material: Clear resin and ESD resin
Print time: 1 hour 25 mins and 2 hours 53 mins
Part cost: £1.50 and £9.01
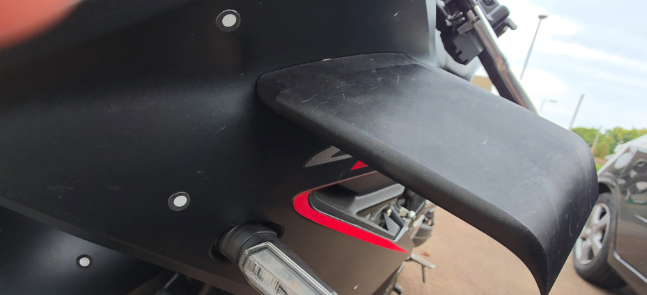
Passive Aero:
Enhancement to the bike's body to reduce drag, enhance stability, improve cooling and generate downforce.
Material: Tough 2000 resin
Print time: 4 hours 15 mins
Part cost: £64.95
Mirror Mount:
Bespoke mount for mirror to extend field of view. Mount has a textured surface for engineered aesthetic.
Material: ESD resin
Print time: 3 hours 18 mins
Part cost: £19.38

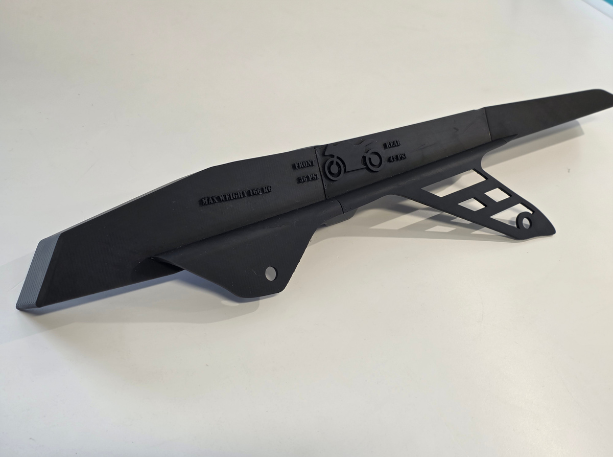
Chain Guard:
To provide pleasing aesthetics and act as a durable, protective cover against debris. Not exposed to high temperatures.
Material: Black resin
Print time: 10 hours 3 mins
Part cost: £47.87
Each design was generated from the scan geometry, ensuring form, fit, and function were optimised from the outset - no guesswork, no iterative fitting required.
Rapid Production through Additive Manufacturing
All parts were printed on the Formlabs Form 4 or 4L, taking advantage of its speed and material versatility.
Print times ranged from just over an hour for smaller housings to around 10 hours for larger protective components such as the chain guard.
This flexibility allows engineers to move quickly from design to production without tooling costs or setup delays, particularly valuable for low-volume or one-off components.
The speed of the Form 4 series printers also means we can design, fit, test and iterate very quickly and at low cost. If a design change is required, we can make a quick adjustment to the the CAD model and reprint within hours, reducing downtime and improving development efficiency.
Watch the Scan to Print Process
From Prototype to Performance
The finished components fit seamlessly onto the motorbike, demonstrating the capability of 3D printing to produce end-use, accurate and high-quality parts, with excellent surface finish and functional material properties.
While this project focused on accessories and components for a motorbike, the principles apply across engineering and manufacturing.
• 3D scanning provides data accuracy for difficult to obtain geometries
• Additive Manufacturing provides design and production agility
Together, they enable a fully digital workflow, reducing lead time, costs and manual labour, while maintaining engineering-grade performance with increased functionality.